User Management
Go to User Administration > User Management to set up and maintain regular users and user administrators. To get started, view the Quick Reference Guide.
Note: When you access any User Administration page, you are prompted to verify your account with email authentication. Follow the on-screen instructions to complete this process. The authentication email goes to your account recovery email address.
Select the following drop-downs for step-by-step help:
When you select User Management, a list of existing users for your organization appears.
- Administrators can manage regular users and user administrator accounts.
- User administrators can manage regular user accounts.
- Only ARUP can manage administrator accounts.
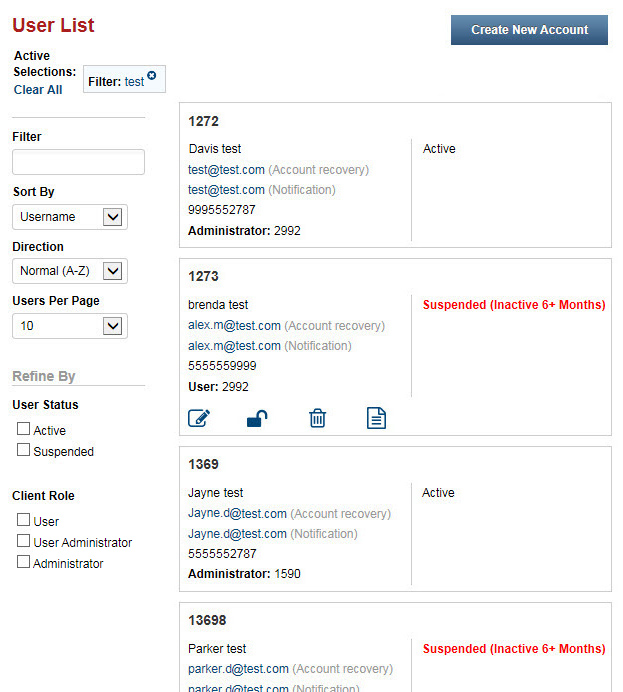
Use the following tools to locate specific users.
- Filter. Type any portion of the user’s first or last name, user name, or email address. As you type, the list shows only records matching your search.
- Sort By. Select Username, First Name, Last Name, or Email. The User List is sorted alphabetically, based on your selection.
- Direction. Select Normal (A-Z) to have the list display alphabetically or Reversed (Z-A) to have the list display alphabetically in reversed order.
- Users Per Page. Select the number of search results to display.
- Refine By. Select one or more options. The User List displays only users that match your selection(s).
The User List retains your search criteria if you navigate to another page.
 Select
the Edit icon to edit profile information, edit permissions, and/or reset multifactor authentication.
See Edit account for step-by-step instructions.
Select
the Edit icon to edit profile information, edit permissions, and/or reset multifactor authentication.
See Edit account for step-by-step instructions.
Note: If you don't see this icon or the following icons for a specific user, the user is at the same permission level as you or higher.
See Find an existing user for more information about finding a specific user account to edit.
 Select
the Suspend icon to block
the user’s access to ARUP Connect™ without deleting the user account. This retains the history log
for the user.
Select
the Suspend icon to block
the user’s access to ARUP Connect™ without deleting the user account. This retains the history log
for the user.
 Select the Unsuspend icon
to unsuspend a user’s account.
Select the Unsuspend icon
to unsuspend a user’s account.
 Select the Reset Password icon. The user receives an email with instructions for resetting their password.
 Select the Delete icon to
delete a user’s account. Deleting a user removes your record of that user’s
profile and activity log. If you do not wish to delete the activity log,
you can suspend the account instead.
Select the Delete icon to
delete a user’s account. Deleting a user removes your record of that user’s
profile and activity log. If you do not wish to delete the activity log,
you can suspend the account instead.
Note: If the user has access to client IDs that you don't administer, only the client IDs you do administer will be removed when you select the Delete icon. The account will continue to exist with access to the client IDs you don't administer. If you are deleting a user account that only has access to client IDs you do administer, the account will be fully deleted from Connect.
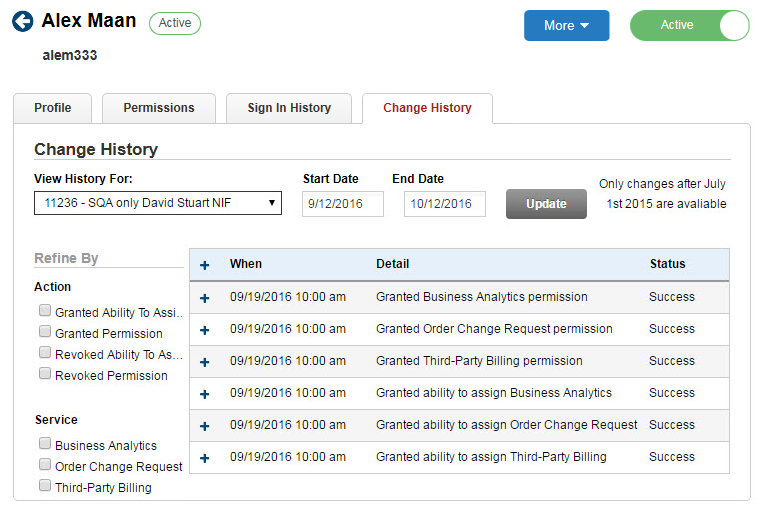
 Select
the View Account History
icon to view the user's Sign In History
tab. You can also view the user's Change
History tab.
Select
the View Account History
icon to view the user's Sign In History
tab. You can also view the user's Change
History tab.
Sign In History: Displays up to 100 of the latest user attempts to sign in to ARUP Connect.
- In the Refine By area, select the Failed Login or Successful Login check boxes to filter the list accordingly.
- Use the Start Date and End Date fields and then select Update to filter by a date range.
- Right click the list and select Print to print.
Note: The log shows the IP address where the login attempt originated, but this may or may not be significant information since a single IP address may be used by the entire organization.
Change History: Displays all updates made to the user's account.
- Select the View History For drop-down menu to select a different client ID.
- In the Refine By area, select an Action and/or Service to filter the list accordingly.
- Use the Start Date and End Date fields and then select Update to filter by a date range.
- Right click the list and select Print to print.
Before creating a new user account, search the User List to ensure the account doesn't already exist. See Find an existing user.
-
On the User Management page, select Create New Account.
The New Account page appears. -
Complete the form.
Note: If you enter an email address that is set up for Single Sign-On, the password fields disappear. The user can sign in with just their email address.
-
Select Create User. The new user receives an email with instructions for activating their account.
The Connect Permission Roles page appears. You will set up the user's permission role, additional services, and administrator rights starting here.
Note: If you want to skip the permission roles step and set up individual services manually (not recommended), select customize permissions, and skip to step 6.
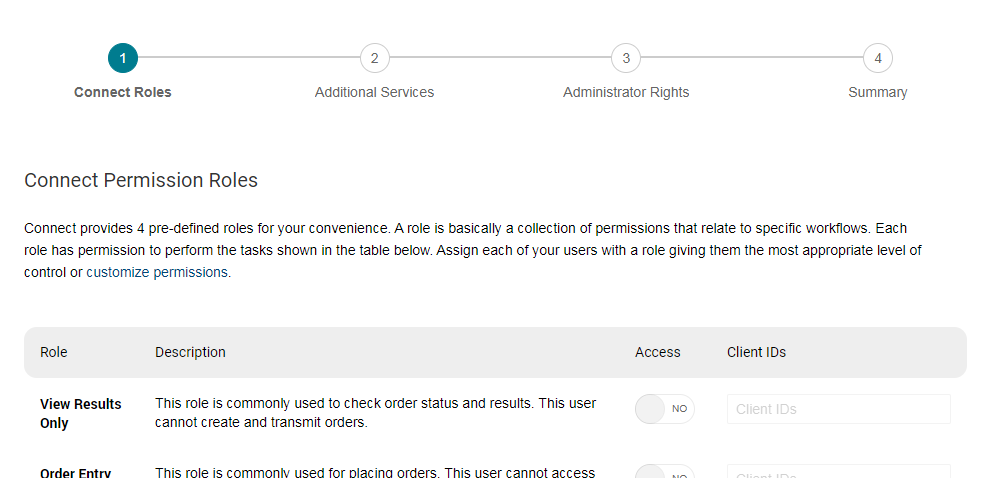
-
On the Connect Permission Roles page, you will see a list of roles. Switch a role's toggle key
 to Yes to assign the role. Select the Client IDs field to choose which client IDs the new user will access.
Tip: Scroll to the bottom of the page to see which applications and services are included in each role.
-
Select Next.
-
On the Additional Services (or Connect Services) page, assign any additional services to the new user by switching the service's toggle key
to Yes and then adding client ID(s) in the Client IDs field. Select Next. -
On the Administrator Rights page, if the new user will be a user administrator, switch the toggle key
to Yes and then add client ID(s). Select Next. -
On the Summary page, review the roles, services, and administrator rights you've assigned. If you need to edit anything, select Back, or select a previous step at the top of the page.
-
In the Enable email notifications section, switch the toggle key
to Yes if the new user needs to receive email notifications. -
Select Save Changes.
On the login page for ARUP Connect, there is a Create
Account link. While this link is primarily intended for setting
up an administrator for a new ARUP Connect client, any person could potentially
use this link to request access to ARUP Connect. After selecting the link,
they will complete and submit the registration form.
If they are from within your organization, and you are the administrator or user administrator,
you will receive an email from ARUP Connect requesting access for them.
See New User Request for information
about processing the request.