Add/edit/copy an ARUP test
You may import ARUP test data when adding or editing a test.
- Select Add Test
 in the lower portion of the page.
 - Enter a Test Number and Test Name.
- Choose a Test Start Date, or leave the current date. The start date determines when the test shows publicly.
- (Optional) Choose a Test End Date. Leave the field blank if you want the test to remain active until you manually choose to remove the test.
- Enter a valid ARUP test number in the ARUP Test Number field. Results filter as you type.
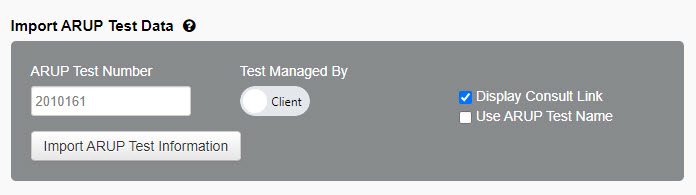
- Use the Test Managed By toggle switch to select one of the following options:
- Select Client if you want to enter the information for this test (default option). You can still import ARUP test information and then make modifications to any field.
- Select ARUP If you want to import all ARUP standard fields. If you select this option, you will only be able to edit the Synonyms, Storage Transport Temperature, and Reported information fields.
Note: If you select ARUP after you have entered test information into the fields, the information you have previously entered will be overwritten by ARUP test data.
- Activate/Deactivate the import options.
- Enter or modify any information in the available fields. The fields that allow you to add or modify information depend on your selection in the Test Managed By field.
Note: You can also copy existing ARUP tests in your laboratory test directory to expedite the creation process. See the Copy a single test topic.
- Select Publish in the lower portion of the page.
Note: If you're not ready to publish, select Save Draft to save your work and return later. To access a draft, select Admin and then the Test Submission tab. Drafts appear in the Test(s) Draft list.
The Test Detail dialog box opens.
- If needed, select an Effective Date. This is the date the test will become active.
- Enter any comments in the Comments text box.
- Select Save.
Note: A comment may not be required based on settings. See Change comment requirements for more information.
- Search for the test.
- Select the appropriate test.
- Select Edit Test in the lower portion of the page.
- Type the ARUP test in the ARUP Test Number field. Results will filter as you type.
- Use the Test Managed By toggle switch to select one of the following options:
- Select Client if you want to manage the test information for this test (default option). You can still import ARUP test information and make modifications to any field.
- Select ARUP If you want to import all ARUP standard fields. select the toggle to change to ARUP. All fields will be updated with ARUP data. You will only be able to edit the Synonyms, Storage Transport Temperature, and Reported information fields.
Note: If you select ARUP after you have entered test information into the fields, the information you have previously entered will be overwritten by ARUP test data.
- Activate/Deactivate the import options.
- Make any of your additional edits in the available fields. The fields that can be edited depend on your selection in the Test Managed By field.
- Select Publish in the lower portion of the page.
Note: If you're not ready to publish, select Save Draft to save your work and return later. You can locate the draft later by searching or by selecting Admin and then the Test Submission tab. Drafts appear in the Test(s) Draft list.
The Test Detail dialog box opens.
- If needed, select an Effective Date. This is the date the edits will become active. See Add pending (time-delayed) changes for more information.
- Enter any test change comments in the Comments text box.
Note: A comment may not be required based on settings. See Change comment requirements for more information.
- Select Save.
You can copy existing ARUP tests in your laboratory test directory to expedite the creation process. To copy an existing test in your laboratory test directory:
- Search for the test.
- Select the appropriate test.
- Select Copy Test at the bottom of the screen. A copy of the test opens.
- Enter/edit any fields as necessary.
- Select Publish at the bottom of the screen.
Note: If you're not ready to publish, select Save Draft to save your work and return later. You can locate the draft later by searching or by selecting Admin and then the Test Submission tab. Drafts appear in the Test(s) Draft list.
-
The Test Detail dialog box opens.
- If needed, select an Effective Date. This is the date the edits will become active. See Add pending (time-delayed) changes for more information.
- Enter any test change comments in the Comments text box.
Note: A comment may not be required based on settings. See Change comment requirements for more information.
- Select Save.
Note: The test number, name, start date, and end date information is not included in the copy. Pending, draft, or submitted tests cannot be copied.