Register a patient
Before you can order tests, you must search for an existing patient on the Test Order Information tab. If the patient is not already in the system, a patient registration form appears. Fields marked with an asterisk (*) are required and all other fields are optional. The patient demographics you enter are saved in the system and will be retrieved for subsequent visits for this patient. Press the Tab key to move to the next field as you enter data.
Complete the registration form
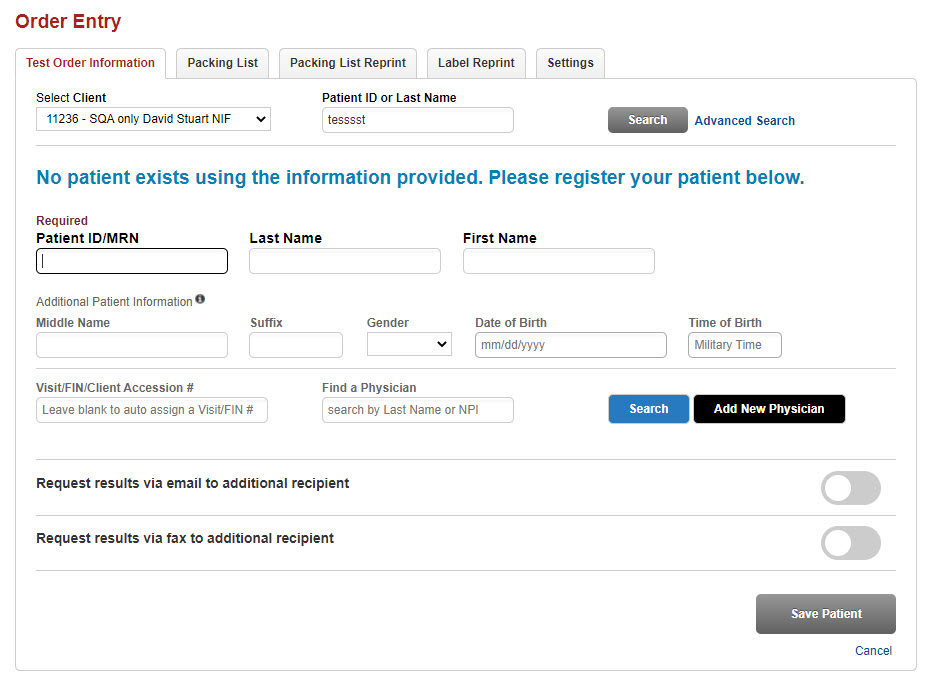
- The Client ID was selected prior to searching for the patient name and already displays.
- Patient ID (Patient MRN). Enter the patient's Patient ID or medical record number. When entering future orders for this patient, you will always use this same medical record number.
- In the available name fields, enter the patient's name information.
- Gender. Select from the drop-down list Female, Male or Unknown. You may simply type the letter F, M or U to select.
- DOB. Enter the date of birth in numbers (mmddyy); for example, 052375 for May 23, 1975. The system will automatically format the date from the numbers you enter; for example, 05/23/1975.
Note: It is important to enter the Date of Birth, if at all possible, in order to have the correct reference ranges included with test results on the patient report.
- Time
of Birth. If you are entering a birth date for an infant
less than 2 days old, the system will prompt for the time
of birth to be entered in military format (from 00:00 to 23:59 hours.
Enter the birth time; for example 1317, as in the example below. The
system will format the time automatically.

- Enter a Visit Number to identify this visit for this patient. If your system auto-generates this number, skip this step. Each new order for the patient should include a unique visit number. A patient should have just one Medical Record Number, but may have multiple visit numbers in the system.
- Use the search to select an AdmittingPhysician. If the name is not found, select the add button to add a new physician.
- If you want to also email and/or fax the results to a specific recipient, switch the Request results via email to additional recipient and/or Request results via fax to additional recipient toggle(s) to on, and enter the email and/or fax information. If the physician is the email or fax recipient, select the Same as Physician checkbox.
- Select Save Patient to save the header information and new doctors for the order and proceed with adding tests. If you do not wish to save the order you have started, select Clear Patient. Any information that has not been saved will be discarded.
See Select and add tests for next steps.