View reports
Select Admin and go to the Reports tab to view reports.
This report shows a list of users who have logged into your laboratory test directory and their IP addresses.
To view the report, select the report type, select a date range, and select Generate Report.
This report shows the date and time that individual tests were viewed.
To view the report, select the report type, select a date range, and select Generate Report.
This report shows an audit of all the changes made to your laboratory test directory by administrators.
To view the report, select the report type, select a date range, and select Generate Report.
Select Analytics to email an Excel file that shows test views during a specified time period.
- Select Analytics from the Report Type drop-down menu.
- Choose the Start Date and End Date.
- Select Generate Report. The Export Settings dialog box opens.
- In the Email Address field, enter the email address of any recipient(s) to receive the report.
- In the Subject field, enter a subject for the export.
- In the Message field, enter a message for the export, if applicable.
- Select Export. An email containing a link to the exported test information is sent to all recipients. The recipients can open the link and print or save the information.
Select TestExport to email an Excel or PDF file with a list of all tests currently found in your laboratory test directory. Note that this can be a very large report and may take a few moments to generate.
- Select TestExport from the Report Type drop-down menu.
- Select Generate Report. The Export Settings dialog box opens.
- If you want to exclude inactive tests from the report, select the Exclude Inactive Tests checkbox.
- Choose the Export Format (Excel or PDF) from the drop-down menu.
- In the Email Address field, enter the email address of any recipient(s) you want to receive the export email.
- In the Subject field, enter a subject for the export.
- In the Message
field, enter a message for the export, if applicable.
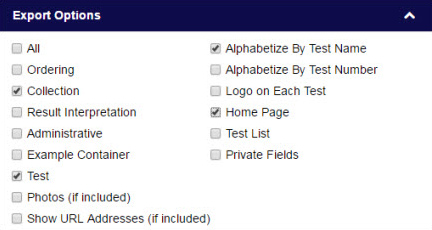
- If you selected PDF format, you can select to expand an Export
Options section at the bottom of the dialog box where you can include or exclude additional
options.
- Select Export. An email containing a link to the exported test information is
sent to all recipients. The recipients can open the link and print
or save the information.
Select TestChangeAudit to generate and email a list of all test changes, the users who made the changes, and regulatory compliance changes, in an HTML format.
- Select TestChangeAudit from the Report Type drop-down menu. The search criteria box opens.
- Choose the Start Date and End Date with the calendar tool to choose a date range for your report.
- Enter the test name(s) or number(s) into the search box and
select the test(s) you want to include in the report. The selected
test(s) display below the search criteria box.
OR
Activate the Include All Tests checkbox test type(s) (Active, Inactive, Deleted) that you want to include in the report.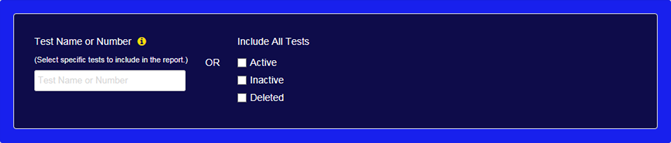
- Select Generate Report. The Export Settings dialog box opens.
- In the Export Format drop-down menu, select a report format: Excel or HTML.
- In the Email Address field, enter the email address of any recipient(s) you want to receive the export email.
- In the Subject field, enter a subject for the report.
- In the Message field, enter a message for the export, if applicable.
- Select Export. An email containing a link to the exported test information is sent to all recipients. The recipients can open the link and print or save the information.
Note: When activating any of the Include All Tests checkboxes, all tests you have entered are removed from beneath the search criteria box.
Overview video
Select TestSnapshot report to generate and email a snapshot export of how a test appeared in Gateway on a selected date for validation purposes.
- Select TestSnapshot from the Report Type drop-down menu.
- In the Date field, select the date that you want to view a snapshot of the test.
- In the Test Name or Number
field, enter the test name or number for the test you want to view.

- Select Generate Report. The Export Settings dialog box opens.
- The Export Format drop-down menu is set to PDF, and cannot be changed.
- In the Email Address field, enter the email address of any recipient(s) you want to receive the export email.
- In the Subject field, enter a subject for the report.
- In the Message field, enter a message for the export, if applicable.
- Select Export. An email containing the exported test information is sent to all recipients.
Select Notifications to generate and email a report that lists when a notification was created, who created it, if it was a site or test notification, the notification message, and the start/end dates.
- Select Notifications from the Report Type drop-down menu. The Start Date and End Date fields appear.
- Choose the Start Date and End Date with the calendar tool to choose a date range for your report.
- Select Generate Report. The Export Settings dialog box opens.
- In the Email Address field, enter the email address of any recipient(s) you want to receive the export email.
- In the Subject field, enter a subject for the report.
- In the Message field, enter a message for the export, if applicable.
- Select Export. An email containing a link to the exported notification information is sent to all recipients. The recipients can open the link and print or save the information.
- Select Close when you are finished.